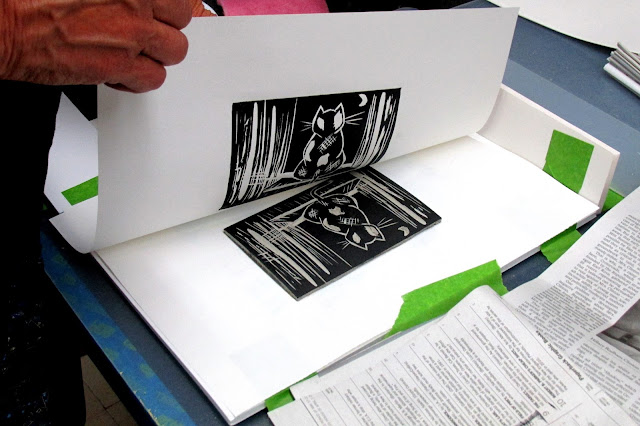
Now, this is my first carving and as you'll see as we get to the printing process, I have a long way to go. There is much in this carving of my window cat that I would change in a heartbeat (and probably will try to or else recarve it later). So this is a first attempt -- and it's instructive to show it as a reminder that we don't all start as well as Kate does -- or the remarkable Heather and Gary of Little Ram Studio in England. (Their blog is one of my favorites; I adore their beautiful prints!)
There is something you should know about me -- when I was in graphics in ninth grade I got an A. My teacher told my parents I was the messiest kid in the class. And the smartest. He was sort of forced into it because my projects were B-ish but the written tests were
all As!
So, down we went to the studio ready to print.
Kate demonstrated the inking process. You use an oil based ink that cleans up in water. (Keep those baby wipes handy!) Using a rubber brayer you smooth the paint till, as Kate says, "it sounds right." I'm not sure I could quite tell what "right" was -- a little squeaky, perhaps?


Then you ink your linocut, moving your brayer in one direction at a time (any direction works but not back-and-forth) until your piece is covered in ink. Then flip it over onto your paper.


You flip it onto your printing surface and use a burnisher, rubbing it over your inked linocut with fairly heavy pressure.
Then flip your paper over (holding the edge of your cut so it doesn't slip) and using the back of a spoon, continue rubbing, hard, and you'll see the ink reveal your pattern.
When it looks as though your pattern is visible enough (that's something you just learn -- what "enough" is), hold your work at one corner and gently remove the paper from the lino.
Voila!
Kate says the first prints from the lino are never the best and that the more you print, the better they become. I found that true as well. I chose black as my color (because we know a black-and-white cat that is always an inspiration). But when I printed on a gelli-printed substrate, my black cat became calico!
Let your prints dry and clean your block. Make any adjustments and count the moments till next time!
My observations on this process. One, it It requires a lot of pressure and elbow grease. I was literally sweating onto the work area. Not attractive. Dress appropriately and keep paper toweling handy to mop your dewey brow.


Two, you can get really messy. So keep those baby wipes handy!
Now, I know a lot of people make their prints with presses (which makes a lot of sense). If you are doing it this low-tech way, you need to count on a lot of elbow grease and pressure.But what I really loved about this was that it could be done low-tech. You need the right tools to carve, ink, paper, and very little else. The carving requires a linoleum piece (if it's on a block it's a bit easier to work with but mine was not).
You also need a good apron (like this one made by Joanne!) and yes -- don't forget the baby wipes! Did I mention that before?
Every new technique requires a lot of work and a lot of practice and I have my work cut out for me if I decide to pursue this one in depth. But I have to admit, it's pretty tempting because it was an awful lot of fun and I can't wait to see where I go next!


